
Understanding Fragments and Fragment Management in Android - A Comprehensive Guide for Developers


Introduction
A fragment is a small reusable piece of activity that is hosted by an activity. However, they are different from normal activities & have their own lifecycle, and manage their own layout.
We can combine multiple fragments in a single activity to build a multi-panel UI. We can reuse a fragment in multiple activities.
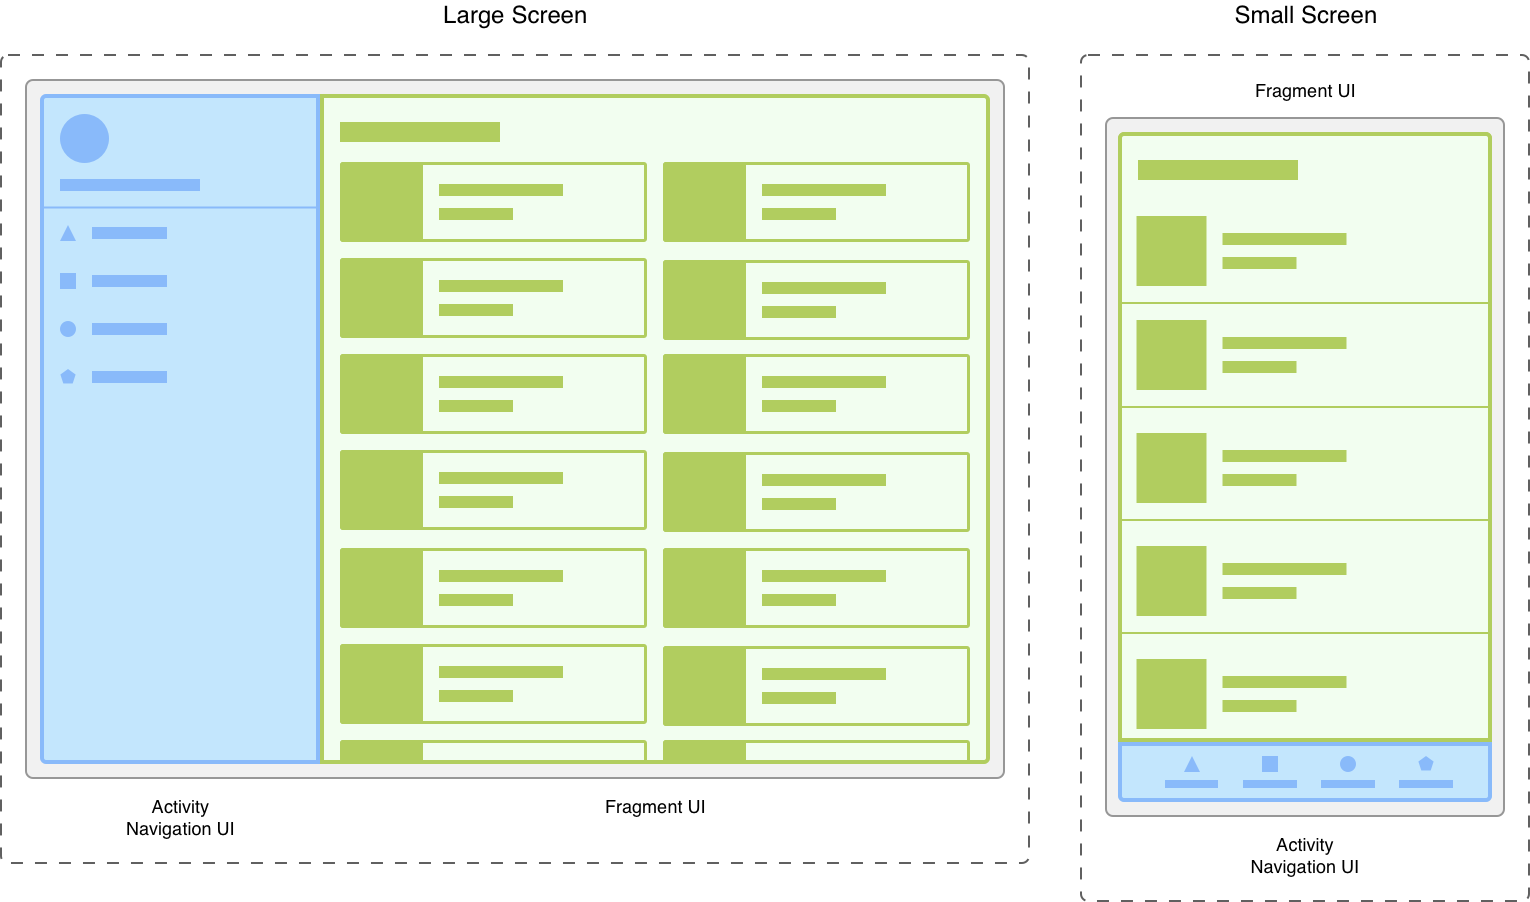
A fragment must run inside an activity as the lifecycle of a fragment depends on its parent activity's lifecycle.
Fragment Creation in Android
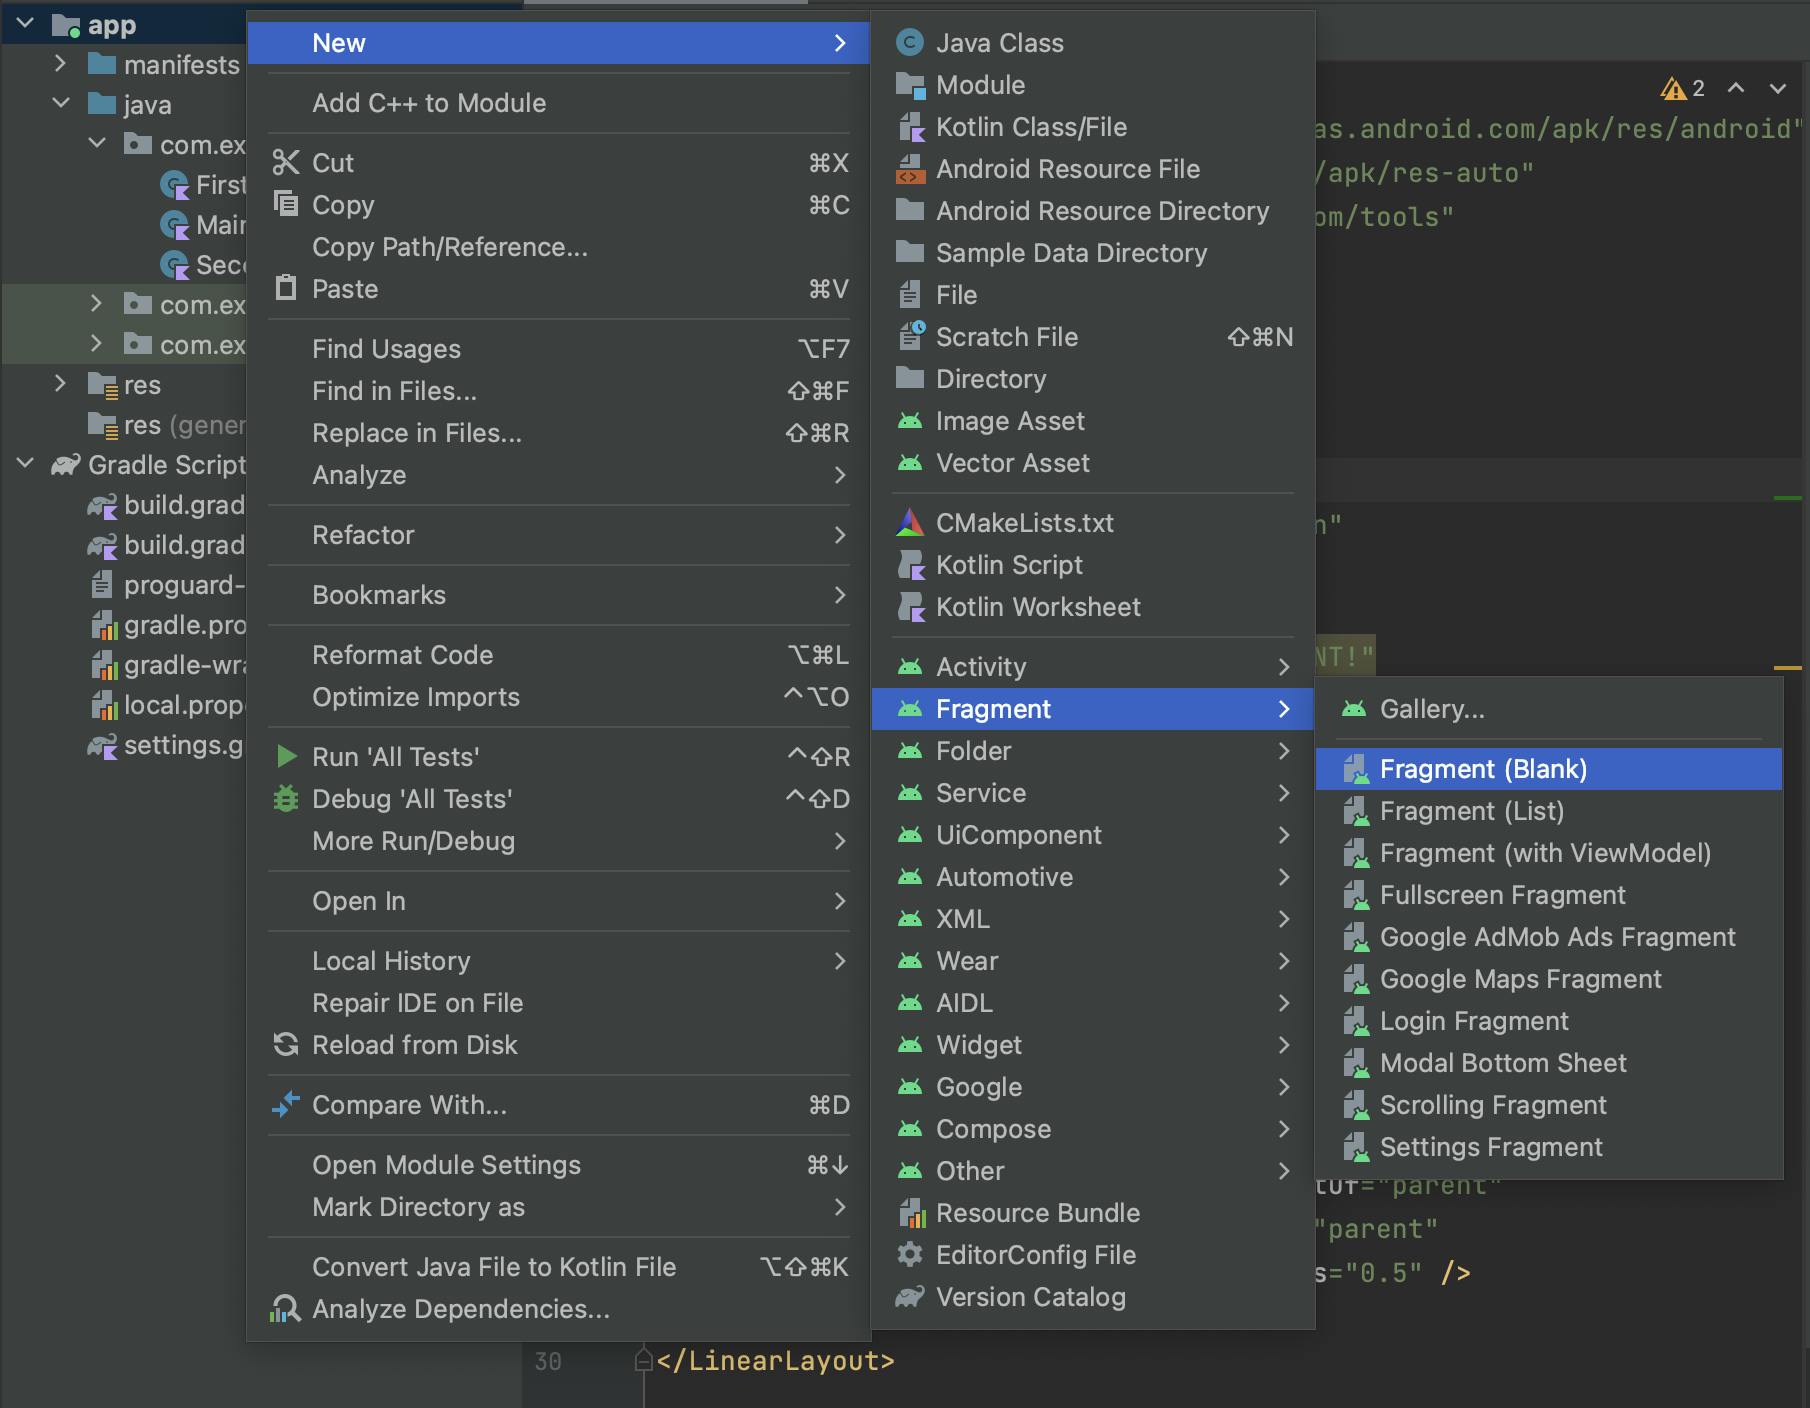
Creating a Fragment creates the corresponding Kotlin & XML file associated with the Fragment.
//FirstFragment.kt
import ..
class FirstFragment : Fragment() {
    override fun onCreateView(
        inflater: LayoutInflater, container: ViewGroup?,
        savedInstanceState: Bundle?
    ): View? {
       // Inflate the layout for this fragment
       return inflater.inflate(R.layout.fragment_first, container, false)
    }
}
//similarly fragment_first.xml is created
Navigating to Fragment in our Activity :
FragmentManagerclass is responsible for performing actions on fragments such as adding, removing, replacing, and adding them to the back stack. FragmentManager can be accessed both from an activity or from a fragment.Each set of fragment changes that you commit is called a transaction, and we can specify what to do inside the transaction using the APIs provided by the
FragmentTransactionclass. An instance ofFragmentTransactioncan be accessed from theFragmentManagerby calling thebeginTransaction()method.
We can group multiple actions into a single transaction - for example, a transaction can add or replace multiple fragments.Within the transaction, we can then perform an
add()orreplace()operation on the layout container.
<!-- activity_main.xml -->
<LinearLayout .. >
    <FrameLayout
        android:id="@+id/frame" .. />
</LinearLayout>
import ..
class MainActivity : AppCompatActivity() {
    override fun onCreate(savedInstanceState: Bundle?) {
     super.onCreate(savedInstanceState)
     setContentView(R.layout.activity_main)

     val fragmentManager : FragmentManager = supportFragmentManager
//creating fragment manager
     val fragmentTransaction : FragmentTransaction = fragmentManager
                                                    .beginTransaction()
//creating fragment transaction
     val firstFragment = FirstFragment()
//creating a object to hold our fragment

        fragmentTransaction.add(R.id.frame,firstFragment)
//create a transaction that adds fragment to the container layout
        fragmentTransaction.commit()
//commit changes
    }
}

Changing Fragment in Activity
In Android, each transaction involving fragments should be done within a transaction block FragmentTransaction. Once a transaction is committed, it cannot be reused. Therefore, when you want to perform another fragment transaction, you need to create a new FragmentTransaction instance.
Creating a new fragment named SecondFragment.
changeBtn.setOnClickListener {
  val fragmentTransaction : FragmentTransaction = fragmentManager.beginTransaction()

  val secondFragment = SecondFragment()

  fragmentTransaction.replace(R.id.frame,secondFragment)
//as we need to replace the previous fragment
  fragmentTransaction.commit()
//commit() call signals to the FragmentManager
//that all operations have been added to the transaction.
}
Fragment BackStack in Kotlin
By default, the changes made in a FragmentTransaction are not added to the back stack. To save those changes, we need to call the addToBackStack() method on the FragmentTransaction .
Hence, pressing the back button on a fragment UI on which we landed after switching multiple fragments will lead to the closing of the application or the return to the previous activity from the activity back stack.
To maintain fragments backstack we need to use the addtoBackStack() method. When the back stack is popped, all the operations of the transaction, reverse as a single atomic action.
fragmentTransaction.addToBackStack(null)
//placed before the commit call to the transaction
//hence the change caused by the transaction will be added to the
//back stack and be reversed during pop.
ListView inside Fragments
Views or ViewGroups inside a Fragment, can't directly be accessed from the findViewById() method. They need an object of the type View, that represents our view to access the corresponding fragment elements.
override fun onCreateView(
        inflater: LayoutInflater, container: ViewGroup?,
        savedInstanceState: Bundle?
    ): View? {
  val view : View = inflater.inflate(R.layout.fragment_second,
                                     container, false)
  //val list : ListView = view.findViewById(R.id.listview)
  // Inflate the layout for this fragment
  return view
    }
//callback runs just after the fragment view is created
override fun onViewCreated(view: View, savedInstanceState: Bundle?) {
 super.onViewCreated(view, savedInstanceState)

 val list = view.findViewById<ListView>(R.id.list)
//views & viewgroups on the fragment can be accessed by view.findView...
 val adapter = activity?.let {
  ArrayAdapter.createFromResource(it,
                R.array.cities,android.R.layout.simple_list_item_1)
  }
//it represents our fragment activity.
 list.adapter = adapter

 list.setOnItemClickListener { adapterView, view, position, l ->
   val intent = Intent(activity,SecondActivity::class.java)
   intent.putExtra("position",position)
   startActivity(intent)
 }
}
Here our SecondFragment consists of a listView, if the user presses any element of the list, SecondActivity is opened & the position of the element clicked is passed to it.
Passing Data from an Activity to Fragment using Bundles
class SecondActivity : AppCompatActivity() {
    override fun onCreate(savedInstanceState: Bundle?) {
        super.onCreate(savedInstanceState)
        setContentView(R.layout.activity_second)

        val position = intent.getIntExtra("position",0)

//creating fragment obj, fragment manager & transaction obj
        fragmentTransaction.add(R.id.frameLayout,thirdFragment)

        val bundle = Bundle()
//creating an object of Bundle class
        bundle.putInt("position",position)
//passing the tag & value
        thirdFragment.arguments = bundle
//binding the bundle to the third fragment

        fragmentTransaction.commit()
    }
}
Accessing Bundle inside the Fragment :
arguments?.getInt("position",0)//tag & default value is passed
Dialog Fragments in Android
A Fragment can be assigned with a Dialog Box functionality using the DialogFragment() method, which is a special fragment subclass.
Creating a Blank Fragment and Creating the Design of the Fragment View:
The root element should be made wrap-content, so that it makes a defined dialog box.
<!--The Root Element should be wrap_content -->
<androidx.constraintlayout.widget.ConstraintLayout ..
    android:layout_width="wrap_content"
    android:layout_height="wrap_content"
    android:background="@drawable/dialog_shape"
    tools:context=".CustomDialogFragment">
    <TextView
        android:id="@+id/textView"../>
    <EditText
        android:id="@+id/nameET"../>
    <EditText
        android:id="@+id/ageET"../>
    <Button
        android:id="@+id/okBtn"../>
    <Button
        android:id="@+id/cancelBtn"../>
</androidx.constraintlayout.widget.ConstraintLayout>
Creating a custom background drawable for our fragment's background, in the drawable directory :
<!-- dialog_shape.xml -->
<shape xmlns:android="http://schemas.android.com/apk/res/android"
    android:shape = "rectangle">
    <corners android:radius="15dp"/>
    <solid android:color="#BFBDBD"/>
</shape>

Calling the Dialog Box Fragment from our MainActivity :
button.setOnClickListener {
    val fragmentManager : FragmentManager = supportFragmentManager
    val dialogFragment = CustomDialogFragment()
//no fragment transaction needed to create a dialog Fragment.
//CustomDialogFragment is our Fragment Name.
    dialogFragment.isCancelable = false
    dialogFragment.show(fragmentManager,"CustomDialogFragment")
//takes the fragment manager & fragment name as parameter
}
fun gettingData(userName : String, userAge : Int){
//used to receive data from fragment
    nameTextView.text = "Name: $userName"
    ageTextView.text = "Age: $userAge"
}
Coding our Dialog Fragment :
class CustomDialogFragment : DialogFragment() {
 private lateinit var okBtn : Button
 private lateinit var cancelBtn : Button
 private lateinit var nameEditText: EditText
 private lateinit var ageEditText: EditText

 override fun onCreateView(
   inflater: LayoutInflater, container: ViewGroup?,
   savedInstanceState: Bundle?
 ): View? {
        // Inflate the layout for this fragment
    val view : View = inflater.inflate(R.layout.fragment_dialog,
                                        container, false)
    nameEditText = view.findViewById(R.id.nameET)
    //assign view to each variable
    dialog!!.window!!
            .setBackgroundDrawableResource(android.R.color.transparent)
    //removes the white edges of the dialog box
    okBtn.setOnClickListener {
       val userName : String = nameEditText.text.toString()
       val userAge : Int = ageEditText.text.toString().toInt()
       val mainActivity : MainActivity = activity as MainActivity
//creating the object of MainActivity
       mainActivity.gettingData(userName,userAge)
//calling the function on the object of mainActivity
//passing the data
       dialog!!.dismiss()
//closing the fragment dialog
    }
    cancelBtn.setOnClickListener {
       dialog!!.dismiss()
    }
    return view
    }
}
Fragment Lifecycle
Each Fragment instance has its own lifecycle. When a user navigates and interacts with our app, the fragments transition through various states in their lifecycle as it is added, removed, and entered or exits the screen.

| CallBack | Function |
onAttach() | called when the fragment(child) has been associated with the activity(parent) i.e. when the fragment is added to the fragment manager & attached to the host activity. |
onCreate() | invoked to initialize the fragment by adding all the required attributes and components. |
onCreateView() | invoked to create the user interface of the fragment. The root of the fragment’s layout is returned as the View component by this method to draw the UI. |
| You should inflate your layout in onCreateView but shouldn’t initialize other views using findViewById in onCreateView. | |
onViewCreated() | indicates that the activity has been created in which the fragment exists. |
onStart() | invoked to make the fragment visible on the user’s device. |
onResume() | invoked to make the visible fragment interactive. |
onPause() | invoked to indicate that the user is leaving the fragment. The system calls this method to commit the changes made to the fragment. |
onStop() | Method to terminate the functioning and visibility of the fragment from the user’s screen. |
If the Fragment needs to be called again on the screen, the onStart() method is invoked. |
| onDestroyView() | invoked to clean up all kinds of resources.
If the Fragment needs to be called again on the screen, the onCreateView() method is invoked. |
| onDestroy() | invoked to clean up the fragment’s state and its lifecycle. |
| onDetach() | invoked to disassociate the fragment from its host activity. |