


Table of contents
ListView
Displays a vertically scrollable collection of views, where each view is positioned immediately below the previous view in the list.
ListView is inherited from the AbsListView class in Android
open class ListView : AbsListView
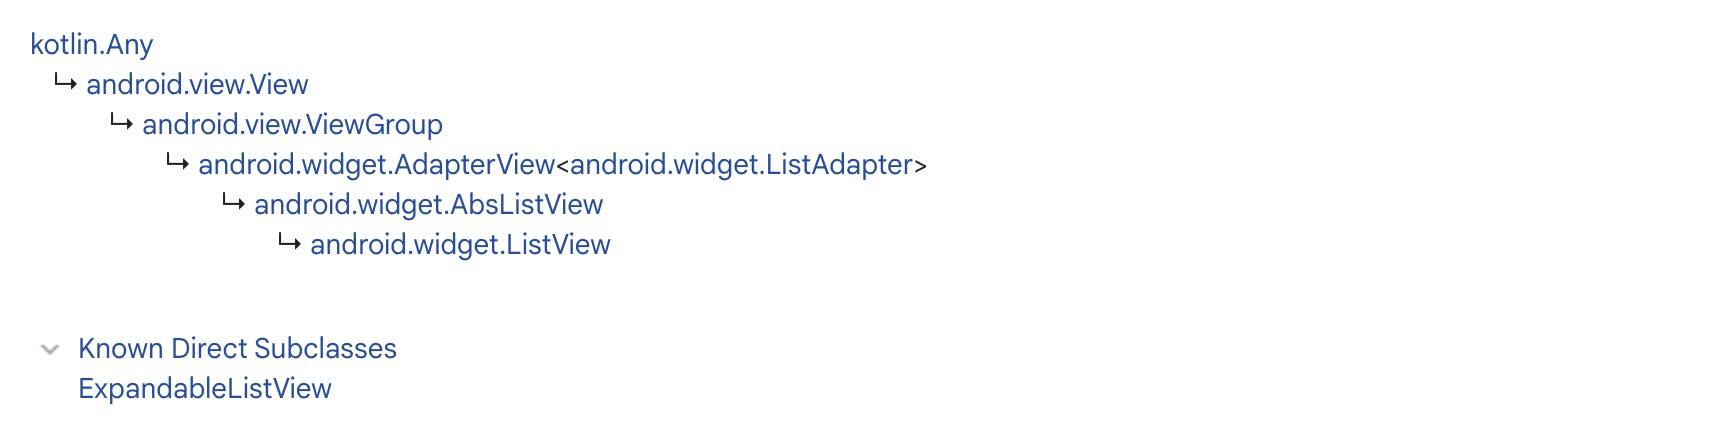
ListView uses an adapter to link the data objects to the view.
ListView inherits XML attributes from our View, ViewGroup & AbsListView class, however, some common ListView attributes are :
android:dividerspecifies the drawable to use between list itemsandroid:entriesspecifies the array resource to link to the list view
Some common AbsListView attributes are :
android:fastScrollEnabledspecifies whether a faster scroll is enabled or notandroid:listSelectorspecifies the drawable used to indicate the selected listviewandroid:textFilterEnabledspecifies whether the list will filter, as the user typesandroid:choiceModespecifies the behavior of choice, 0 for no choice, 2 for multiple choice, 1 for single choice, etc.
Demonstration of ListView in Android :
Creating the XML layout for listView.
 <androidx.constraintlayout.widget.ConstraintLayout .. >

     <TextView .. />

     <ListView
         android:id="@+id/monthList"
         android:layout_width="match_parent"
         android:layout_height="wrap_content"
         android:layout_marginTop="10dp"
         android:layout_marginLeft="10dp"
         app:layout_constraintTop_toBottomOf="@+id/textView" />

 </androidx.constraintlayout.widget.ConstraintLayout>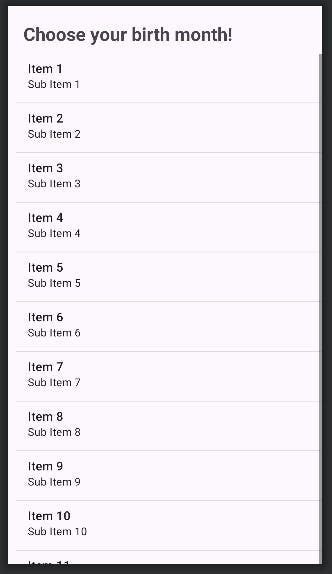
Creating a string array, in the
strings.xmlfile<resources> <string name="app_name">listview</string> <string-array name="months"> <item>January</item> <item>February</item> <item>March</item> <item>April</item> <item>May</item> <item>June</item> <item>July</item> <item>August</item> <item>September</item> <item>October</item> <item>November</item> <item>December</item> </string-array> </resources>val users = arrayOf( "Virat Kohli", "Rohit Sharma", "Steve Smith", "Kane Williamson", "Ross Taylor") //linking array object to the listView val arrayAdapter = ArrayAdapter(this, android.R.layout.simple_list_item_1, users) list.adapter = arrayAdapterLinking the data objects to the listView.
 <!-- Using our listView XML element -->
     android:entries = "@array/months"
// Using Adapter val list = findViewById<ListView>(R.id.monthList) val stringList = resources.getStringArray(R.array.months) val adapter = ArrayAdapter(this, android.R.layout.simple_list_item_1,stringList) //creating an Adapter Object. list.adapter = adapter //Assigning the Adapter to the ListViewPerforming Action when the user interacts with a ListView element
 list.setOnItemClickListener { parent, view, position, id ->
 //where parent referes to our ListView context
 //position returns index of item selected
             val month = parent.getItemAtPosition(position).toString()
             Toast.makeText(this@MainActivity, "You were born in $month", Toast.LENGTH_SHORT).show()
         }
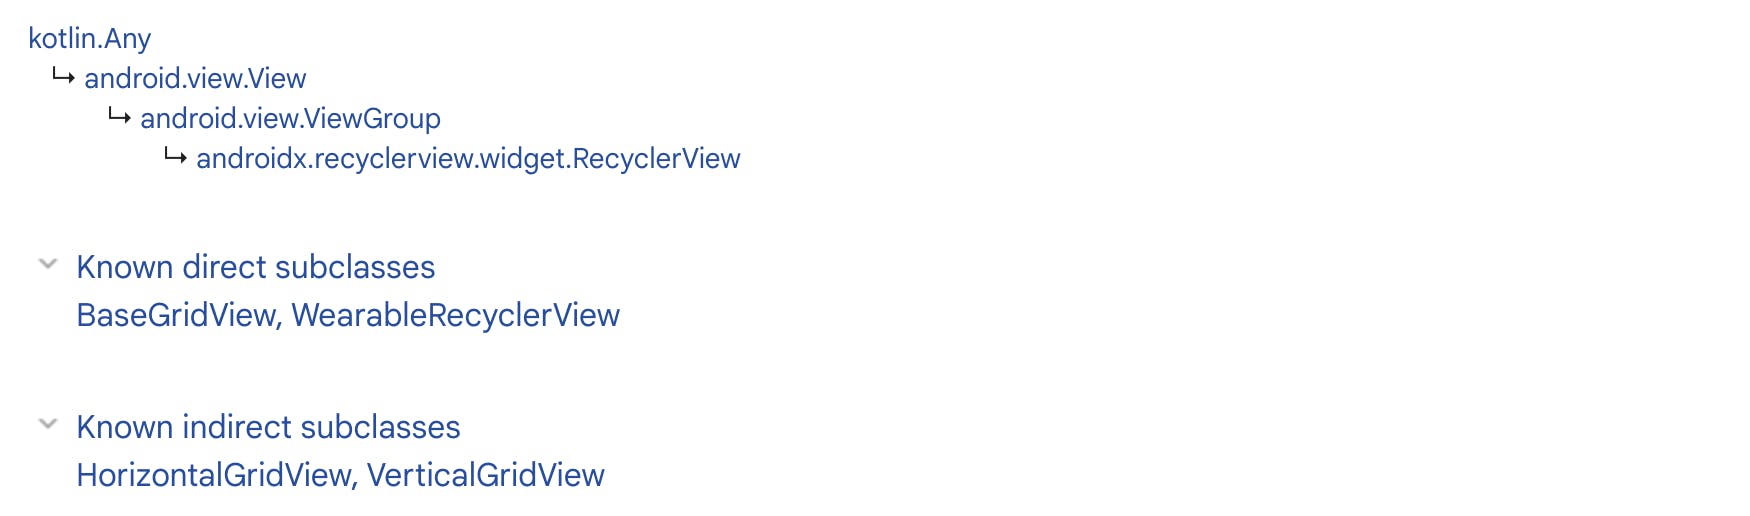
RecyclerView
RecyclerView is a flexible way to display a large collection of views. It is more efficient than GirdView, as it recycles the views that are out of visibility and reduces memory consumption.
class RecyclerView : ViewGroup, ScrollingView, NestedScrollingChild2, NestedScrollingChild3
Creating RecyclerView in Android requires :
Card Layout: an XML layout that will be treated as an item for the list created by the RecyclerView.
Here, we decide how our list/grid looks.
ViewHolder: a ViewHolder class that stores the reference to the card layout views that have to be dynamically modified during the program's execution by a list of data objects.
Here, we extend the ViewHolder class that decides how each element in the list looks and behaves. Our ViewHolder works as a wrapper around our View Object, however, our View Object is sorely managed by the Recycler View.
Data:
Here, we use an Adapter class that binds our data with the ViewHolder views.
Key Classes used in Creating RecyclerView in Android :
RecylerViewwhich is a ViewGroup Class.A Class extending the
RecyclerView.ViewHolderclass, as our ViewHolder object, defines how each element looks.A Class extending the
RecyclerView.Adapterclass, that binds the view with their data.LayoutManagerabstract class, that arranges the view items in our list view.
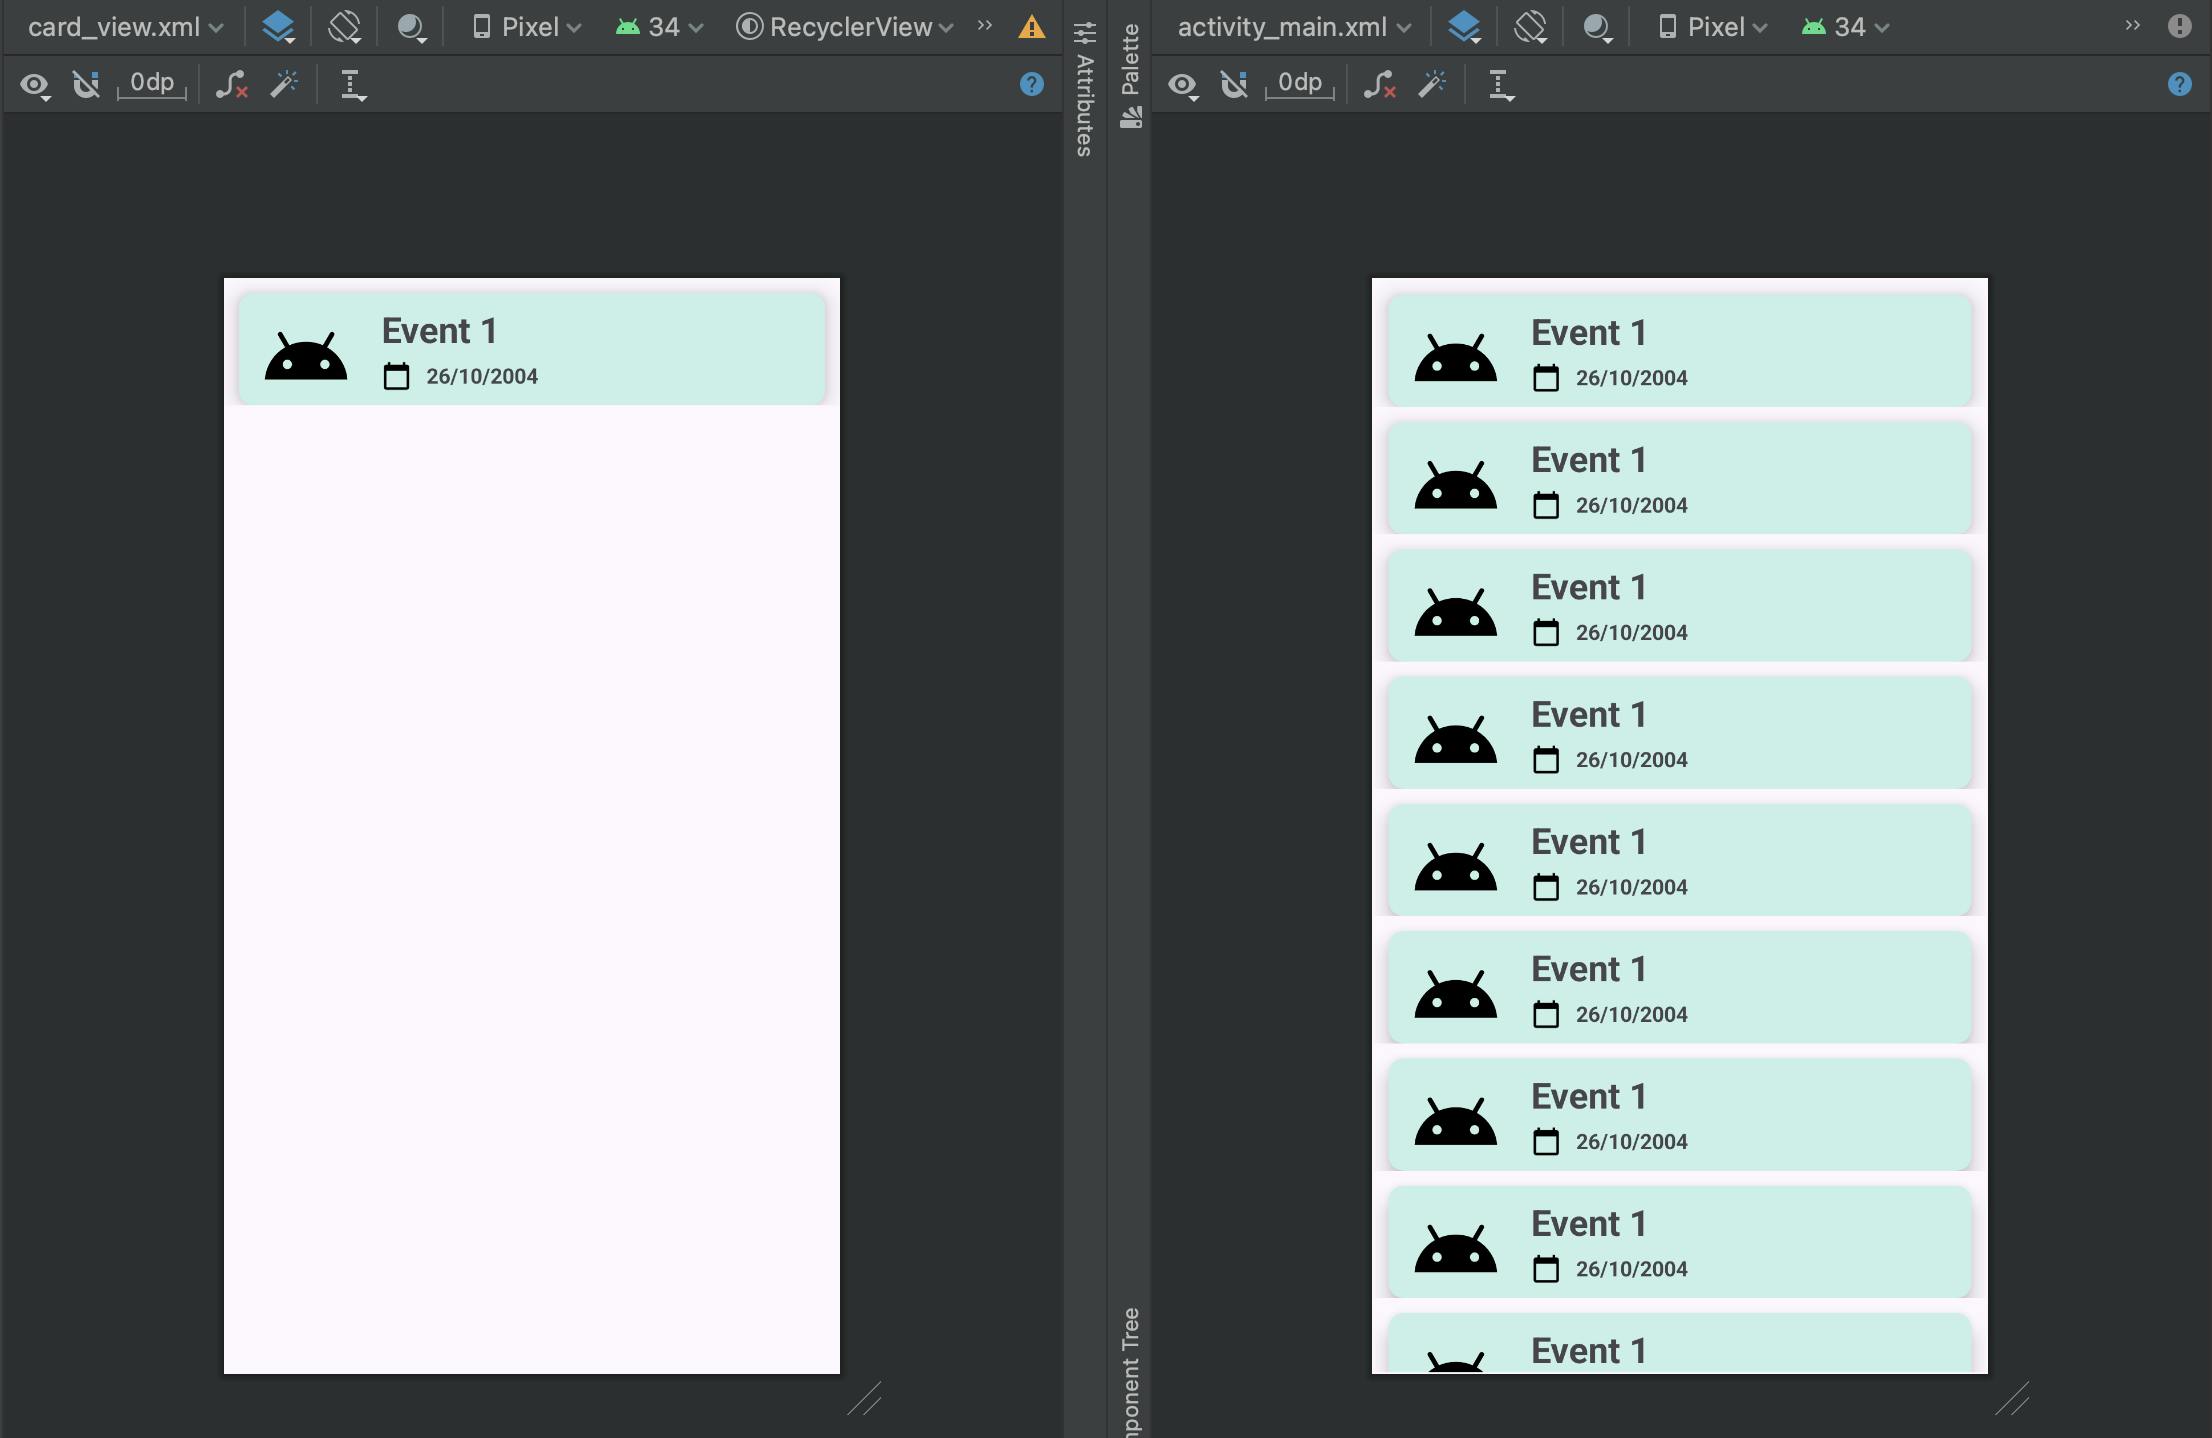
activity_main.xml
<androidx.constraintlayout.widget.ConstraintLayout .. >
    <androidx.recyclerview.widget.RecyclerView
        android:id="@+id/recyclerView"
        android:layout_width="409dp"
        android:layout_height="729dp"
        android:layout_marginStart="10dp"
        android:layout_marginTop="10dp"
        android:layout_marginEnd="10dp"
        android:layout_marginBottom="10dp"
        app:layout_constraintBottom_toBottomOf="parent"
        app:layout_constraintEnd_toEndOf="parent"
        app:layout_constraintHorizontal_bias="0.5"
        app:layout_constraintStart_toStartOf="parent"
        app:layout_constraintTop_toTopOf="parent"
        app:layout_constraintVertical_bias="0.5"
        tools:listitem="@layout/card_view" />
</androidx.constraintlayout.widget.ConstraintLayout>
Here, we define our Recycler View Element, & link it with our Card View Layout using the tools:listitem attribute.
The Card View Layout : card_view.xml file defines the Layout for each List Element.
card_view.xml
<androidx.constraintlayout.widget.ConstraintLayout .. >

    <androidx.cardview.widget.CardView
        android:id="@+id/cardView"
        android:layout_width="match_parent"
        android:layout_height="75dp"
        android:layout_margin="10dp"
        app:layout_constraintEnd_toEndOf="parent"
        app:layout_constraintHorizontal_bias="0.5"
        app:layout_constraintStart_toStartOf="parent"
        app:cardBackgroundColor="#c5f0e8"
        app:cardCornerRadius="10dp"
        app:cardElevation="10dp"
        app:layout_constraintTop_toTopOf="parent">

        <androidx.constraintlayout.widget.ConstraintLayout
            android:layout_width="match_parent"
            android:layout_height="wrap_content">
            <ImageView
                android:id="@+id/iconImage" .. />
            <TextView
                android:id="@+id/eventText" .. />
            <ImageView
                android:id="@+id/imageView2" .. />
            <TextView
                android:id="@+id/dateText" .. />
        </androidx.constraintlayout.widget.ConstraintLayout>

    </androidx.cardview.widget.CardView>
</androidx.constraintlayout.widget.ConstraintLayout>
The Height of the Root Element, in our Card View Layout, should preferably be wrap_content or a definite size. As it represents how a single element looks in our list, not the whole activity.
MainActivity.kt
import android.os.Bundle
import androidx.recyclerview.widget.GridLayoutManager
import androidx.recyclerview.widget.LinearLayoutManager
import androidx.recyclerview.widget.RecyclerView
import androidx.recyclerview.widget.StaggeredGridLayoutManager
class MainActivity : AppCompatActivity() {
override fun onCreate(savedInstanceState: Bundle?) {
super.onCreate(savedInstanceState)
setContentView(R.layout.activity_main)
val recyclerView = findViewById<RecyclerView>(R.id.recyclerView)
//links our recyclerView
val eventList = ArrayList<String>()
val eventDateList = ArrayList<String>()
val imageList = ArrayList<Int>()
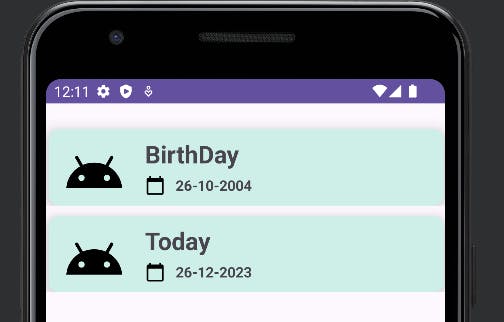
eventList.add("BirthDay")
eventList.add("Today")
eventDateList.add("26-10-2004")
eventDateList.add("26-12-2023")
imageList.add(R.drawable.icon)
imageList.add(R.drawable.icon)
//creating 3 array list to pass to the adapter
//assigning a layout manager to the recycler view
recyclerView.layoutManager = LinearLayoutManager(this@MainActivity)
//creates a linear vertical layout
//recyclerView.layoutManager = GridLayoutManager(this@MainActivity,2)
//creates a grid layout with 2 views in each row
//recyclerView.layoutManager = StaggeredGridLayoutManager(2, StaggeredGridLayoutManager.HORIZONTAL)
//creates a horizontal grid layout with 2 views in each view line
val adapter = eventAdapter(eventList,eventDateList,imageList,this@MainActivity)
//calling the eventAdapter class passing data objects & the application context
//we pass this@MainActivity, as we are accessing the context from a diff class
recyclerView.adapter = adapter
//assigning the adapter
}
}
Creating a Kotlin class file for our Adapter & ViewHolder
eventAdapter.kt
import android.content.Context
import android.view.LayoutInflater
import android.view.View
import android.view.ViewGroup
import android.widget.ImageView
import android.widget.TextView
import android.widget.Toast
import androidx.cardview.widget.CardView
import androidx.recyclerview.widget.RecyclerView

class eventAdapter(
    var eventList: ArrayList<String>,
    var eventDateList: ArrayList<String>,
    var imageList: ArrayList<Int>,
    var context: Context
//passing data objects as parameters
//by creating a primary constructor for our class
//we pass the application context, so that we can perform operations on
//our activity when any View clicked.
) : RecyclerView.Adapter<eventAdapter.EventViewHolder>() {
//our Adapter class extends the RecyclerView.Adapter class
    class EventViewHolder(itemView: View) : RecyclerView.ViewHolder(itemView) {
//we define a ViewHolder class that extends the RecyclerView.ViewHolder class
//we link all our view objects in our ViewHolder class
//so that we can perform operation on them
        var textEventName = itemView.findViewById<TextView>(R.id.eventText)
        var textEventDate = itemView.findViewById<TextView>(R.id.dateText)
        var eventImage = itemView.findViewById<ImageView>(R.id.iconImage)
        var cardView = itemView.findViewById<CardView>(R.id.cardView)
    }

    override fun onCreateViewHolder(parent: ViewGroup, viewType: Int): EventViewHolder {
//this method is called whenever any new ViewHolder needs to be created
//intializes that ViewHolder & its view
        val cardView = LayoutInflater.from(parent.context).inflate(R.layout.card_view,parent,false)
        return EventViewHolder(cardView)
    }

    override fun getItemCount(): Int {
//this method is called to get the size of the dataset
        return eventList.size
    }

    override fun onBindViewHolder(holder: EventViewHolder, position: Int) {
//this method is called to associate data with the ViewHolder
        holder.textEventName.text = eventList.get(position)
        holder.textEventDate.text = eventDateList.get(position)
        holder.eventImage.setImageResource(imageList.get(position))

//called when that ViewHolder is clicked
        holder.cardView.setOnClickListener{
            Toast.makeText(context, "You are celebrating ${eventList.get(position)}", Toast.LENGTH_SHORT).show()
        }
    }
}
GridView
Displays a vertically scrollable collection of views in a 2-dimensional grid. ListAdapter associated with the GridView holds its data.
open class GridView : AbsListView

GridView inherits attributes from the View, ViewGroup & AbsListView class and Some Common XML attributes for GridView are :
android:numColumnsspecifies the number of columnsandroid:columnWidthspecifies the width of each columnandroid:horizontalSpacingspecifies the spacing between the columnsandroid:verticalSpacingspecifies the spacing between the rows
Defining a GridView ViewGroup inside our Root Layout :
activity_main.xml
<androidx.constraintlayout.widget.ConstraintLayout .. >
    <GridView
        android:id="@+id/gridView"
        android:numColumns="2" ../>
</androidx.constraintlayout.widget.ConstraintLayout>
Creating a layout resource file for our grid element :
gridcard_layout.xml
<LinearLayout ..
    android:padding="8dp"
    android:gravity="center">
    <ImageView
        android:id="@+id/imageView" .. />
    <TextView
        android:id="@+id/textView" ..  />
</LinearLayout>

MainActivity.kt
import android.os.Bundle
import android.widget.GridView
import android.widget.Toast

class MainActivity : AppCompatActivity() {
    override fun onCreate(savedInstanceState: Bundle?) {
        super.onCreate(savedInstanceState)
        setContentView(R.layout.activity_main)

        var gridView = findViewById<GridView>(R.id.gridView)
        var nameList = ArrayList<String>()
        var iconList = ArrayList<Int>()

        nameList.add("Google")
        //add elements..
        nameList.add("Twitch")

        iconList.add(R.drawable.ic_android_black_24dp)
        //add elements..
        iconList.add(R.drawable.ic_android_black_24dp)

        val adapter = companyAdapter(nameList, iconList, this@MainActivity)
//creating an Adapter object and passing the data elements and context
//to the companyAdapter's constructor
//we pass this@MainActivity as we will now work inside another class
        gridView.adapter = adapter
//set the adapter to our gridView
        gridView.setOnItemClickListener { adapterView, view, position, id ->
//calling EventHandler when an item clicked in grid
            Toast.makeText(applicationContext,"You selected ${nameList.get(position)}",Toast.LENGTH_SHORT).show()
        }
    }
}
Creating a Kotlin class file:
companyAdapter.kt
package com.example.gridview

import android.content.Context
import android.view.LayoutInflater
import android.view.View
import android.view.ViewGroup
import android.widget.BaseAdapter
import android.widget.ImageView
import android.widget.TextView

class companyAdapter(
    var nameList: ArrayList<String>,
    var iconList: ArrayList<Int>,
    var context: Context
//passing data object & context in the primary constructor of our
//adapter class
) : BaseAdapter() {
//our adapter class extends the BaseAdapte() class
//and implement its methods

    override fun getCount(): Int {
//returns the count of elements in the grid
        return nameList.size
    }

    override fun getItem(position: Int): Any? {
//returns an item of grid view
//not used hence returns null
        return null
    }

    override fun getItemId(position: Int): Long {
//returns the item ID of grid view
//not used hence returns 0
        return 0
    }

    override fun getView(position: Int, convertView: View?, parent: ViewGroup?): View {
//here we access individual items of the grid
        val cardView = LayoutInflater.from(parent!!.context).inflate(R.layout.gridcard_layout,parent,false)
//we assign our gridcard view created for the elements, to a cardView variable of the type View

//we use parent!! to specify that the parent object shouldn't be null
//as parent object is of the type ViewGroup? it can be null

        var companyName = cardView.findViewById<TextView>(R.id.textView)
//we assign the gridView layouts textview element to companyName
        var companyIcon = cardView.findViewById<ImageView>(R.id.imageView)
//we assign the gridview layouts imageview element to companyIcon

        companyName.text = nameList.get(position)
//we set the companyName for that particular grid item
        companyIcon.setImageResource(iconList.get(position))
//we set the companyIcon for that particular grid item

        return cardView
//we return our view
    }
}

ScrollView
In Android when our View or ViewGroup elements exceed the dimensions of our screen, they are nowhere to be seen as they remain outside our viewing window.
Hence, we can use ScrollView or HorizontalScrollView layout containers to make vertically or horizontally scrollable views respectively.
Just add a Scroll View element on the layout file & define elements under the Scroll View tree.
<androidx.constraintlayout.widget.ConstraintLayout .. >

    <ScrollView
        android:layout_width="match_parent"
        android:layout_height="match_parent">

        <TextView .. >
<!-- if our textview goes out of bonds a scroll bar is created -->

    </ScrollView>
</androidx.constraintlayout.widget.ConstraintLayout>
Similarly, a horizontal scroll bar can be created by the HorizontalScrollBar element.