Table of contents
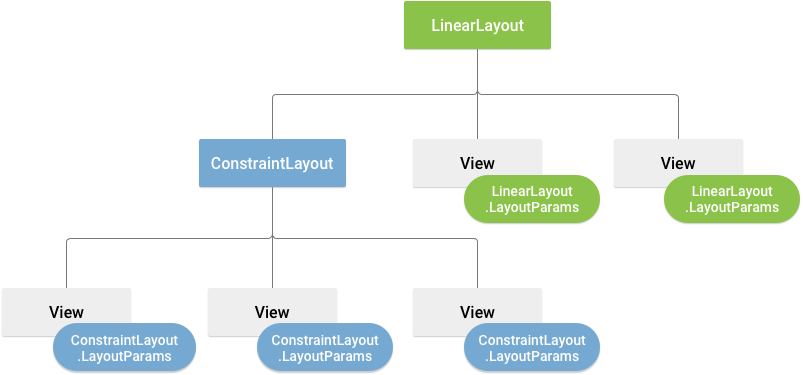
Layout defines the structure of the User Interface in our application. Layout in Android is built using a combination of Views and ViewGroup.
View - acts as an element, which can display something at the interface or handle an event. Objects of view class are called Widgets
Example - Text, ImageView, Button, etc.
ViewGroup - acts as an invisible container, which gives a layout to the view and
viewgroups declared under it. Objects of the ViewGroup class are called Layouts
Example - ListView, GridView, LinearLayout, etc.

Android Layouts and Elements design can be defined in XML. Each XML Layout file consists of a single root element which should be a View or ViewGroup object. Multiple additional elements - layouts or widgets, can be defined under the root element.
<?xml version="1.0" encoding="utf-8"?>
<LinearLayout xmlns:android="http://schemas.android.com/apk/res/android"
              android:layout_width="match_parent"
              android:layout_height="match_parent"
              android:orientation="vertical" >
    <TextView android:id="@+id/text"
              android:layout_width="wrap_content"
              android:layout_height="wrap_content"
              android:text="Hello, I am a TextView" />
    <Button android:id="@+id/button"
            android:layout_width="wrap_content"
            android:layout_height="wrap_content"
            android:text="Hello, I am a Button" />
</LinearLayout>
The above layout file consists of LinearLayout as the root element and it holds the TextView and Button element.
XML files are located inside the res/layout/ directory.
During the compilation of the application each XML layout file is compiled into a
Viewresource. Load the layout resource in your app'sActivity.onCreate()callback implementation. Do so by callingsetContentView(), passing it the reference to your layout resource in the form:R.layout.layout_file_name.
fun onCreate(savedInstanceState: Bundle) {
    super.onCreate(savedInstanceState)
    setContentView(R.layout.main_layout)
}
⭐️ Attributes
Every View and ViewGroup object has its own variety of XML attributes. Some attributes are specific to a View object. And some are common to all View objects because they are inherited from the root View class, like the id attribute.
Other attributes are layout parameters, which are attributes that describe layout orientations of the View object.
ID
Each View object has an integer ID associated with it, that uniquely identifies that View object. During the app compilation, an integer ID is assigned to the string ID given in the XML format.
<LinearLayout android:id="@+id/my_button" />
/* here @ indicates that it needs to be identified as an ID resource
        + indicates a new resource name that must be created and added
          to the resources in the R.java file.
An ID doesn't need to be unique throughout the entire tree, but it must be unique within the part of the tree you search. It might often be the entire tree, so it's best to make it unique when possible.
Views can be referenced in the application by creating an instance of that View object and capturing it from the layout file.
val addButton: Button = findViewById(R.id.addBtn)
// here addBtn is the ID given in the XML file
Layout Parameters
Define layout parameters for the View that are appropriate for the ViewGroup it resides in. Every ViewGroup class implements a nested class that extends ViewGroup.LayoutParams. This subclass contains property types that define the size and position of each child view based on that ViewGroup.

All view groups include a width and height, using layout_width and layout_height, and each view is required to define them.
You can specify width and height with exact pixel measurement, but more often we use :
wrap_content: tells your view to size itself to the dimensions required by its content.match_parent: tells your view to become as big as its parent view group allows.density-independent pixel units (
dp)
Padding & Margins
Padding is used to offset the content of the view. However, the margin specifies the extra space the view takes inside the parent.

Padding can be set using the setPadding(int, int, int, int) method and queried by calling getPaddingLeft(), getPaddingTop(), getPaddingRight(), and getPaddingBottom().
However, it is more convenient to set them using the XML format.
  <?xml version="1.0" encoding="utf-8"?>
  <LinearLayout xmlns:android="http://schemas.android.com/apk/res/android"
                android:layout_width="match_parent"
                android:layout_height="match_parent"
                android:orientation="vertical" >
      <TextView android:id="@+id/text"
                android:layout_width="wrap_content"
                android:layout_height="wrap_content"
                android:layout_margin="16dp"
                android:padding="8dp"
                android:text="Hello, I am a TextView" />
      <Button android:id="@+id/button"
              android:layout_width="wrap_content"
              android:layout_height="wrap_content"
              android:layout_marginTop="16dp"
              android:paddingBottom="4dp"
              android:paddingEnd="8dp"
              android:paddingStart="8dp"
              android:paddingTop="4dp"
              android:text="Hello, I am a Button" />
  </LinearLayout>
📱 Common Layouts
Each subclass of the ViewGroup class provides a unique way to display the views you nest within it.
LinearLayout
aligns its children into a horizontal or vertical orientation
RelativeLayout
defines the position of each child's view relative to other views or dimensions
ConstraintLayout
aligns layout based on constraints to other views
FrameLayout
specify the position of multiple views placed on top of each other to represent a single-view screen
TableLayout
displays child View elements in rows and columns
GridView
places its children in a rectangular grid
ListView
a vertically scrollable collection of views, where each view is positioned immediately below the previous view in the list
